One of my favorite styles of calligraphy has gotta be brush lettering. It’s a great style for beginners, it’s an easier style to learn, and it uses a larger variety of brush pens/paint brushes. It also offers a lot of room for flair and creative expression. I'm going to demonstrate and help you master 3 different alluring designs. I hope you’re all as excited to create these as much as I am! Without further ado, let’s get started.
I’m Illyahna from IllyBoo Designs. I’m a modern calligrapher and lettering artist based in Oxford, UK. This is such a privilege for me, to show you how I like to add a touch of glitz and sparkle into my envelope inserts.
For this particular design, my favorite inks to work with, especially when I want to add a touch of glamour, are the Finetec metallics. This company creates some of the most beautiful luxury inks I’ve come across. They're a little tough to use, as you have to activate the inks beforehand, but the work is worth it!
Supplies

- Finetec Pan Colors (I used rose gold, bronze, moon gold)
- Round size 2 brush
- Larger art brush of your choice
- Pencil
- Ruler
- Scissors
- Double-sided sticky tape or a glue stick
- Black ink or black paint
- White ink or white paint
- Black and white paper
- Multicolor envelopes (size of your choice)
Step 1: Create your insert template

Select the paper that you would like to use for the envelope insert template. You can use any paper because it's just for the template, not the final insert. Make sure the insert is smaller than the envelope to comfortably fit inside them. To ensure this, we need to measure the dimensions of the envelope we are using with a 3mm allowance inside the edge.
Once you have these measurements, draw the outline of your envelope insert in pencil onto the paper that you selected. Use your envelope to help you mark out the flap tip of the insert (shown in image C). You can always make the flap tip more curved or pointed, depending on your preference.
Once you've created your template, cut it out with scissors. Next, draw an outline around the template on the black and/or white paper that you want to use as your envelope insert. Just a note, the paper color doesn't have to be the same color as the envelope, feel free to explore different colors and styles!
Step 2: Activating the inks

Before you can use your Finetec inks, you’ll need to activate them by adding a few drops of water. I recommend leaving the water to soak for around 2-3 minutes, before mixing it. This will help soften the pigment. To mix the inks, just use your brush until you get a smooth consistency that’s easy to write with.
Step 3: Let's get the lettering

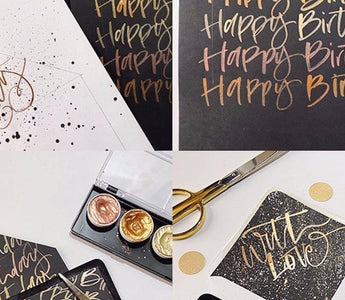
Before we start lettering, it’s important to have an idea of the style that you want to use, as this will influence what inks you use. Images (a, b, and c) highlight the 3 different lettering styles I have created for this project.
Style A: Use a combination of 2 colors: rose gold, and bronze. Start lettering with the rose gold, it's the base ink. The bronze ink gets applied to the top half of the letters as an additional detail, which is a nice way to add two-tone highlights to your lettering. If the base color is wet, this will blend the two colors more than when dry. Make sure that the majority of the lettering is within the envelope insert outline. Finish it off with a splatter of white and bronze ink with the larger brush.
Style B: Use all three metallic ink colors, each line being lettered with a different color. Repeat the color change throughout the layout. Ensure to letter across the entire envelope insert, making sure that you go beyond the envelope outline.
Style C: Use a single metallic ink for the lettering (I used moon gold). Make sure that the majority of the lettering is within the envelope insert outline. Finish it off with a splatter of black ink!
Step 4: Adding finishing touches

Once your lettering has dried, lightly score across the fold line on each of your envelope inserts. This will help to ensure the flap folds crisply and cleanly. Lastly, carefully cut out your envelope inserts, making sure to stick to the guidelines from your template. You can use double-sided sticky tape or a glue stick to secure the flap of your insert to your envelope.
There we have it, your envelope inserts are complete! What a gorgeous way to give a plain little envelope a touch of glamour and elegance.
Please tag me on your sparkly creations on Instagram and Facebook!

I’m Illyahna, owner and calligraphy artist behind Illyboo Designs. I started my calligraphy journey over four years ago and although I still consider myself a newcomer to the world of calligraphy, I have worked within the creative industry as a fashion and graphic designer. So I am able to draw on those skills, to create beautiful bespoke lettering artwork in any project I do.
I teach calligraphy workshops for all abilities and I have my own range of lettering starter kits, so people can join in the fun and practice at home. I also work with Tombow UK where we run regular online brush lettering workshops. My love for creating beautiful stationery and capturing special moments through my designs doesn’t end there, as I am available for celebratory events and commissions too.
You can check out everything I do via my website | Instagram | Facebook
HEY YOU! Yeah, I'm talking to you.. wanna save this for later? PIN IT!


