

Are you searching for a calming, meditative watercolor practice? Then look no further! Today we are going to be creating a beautiful, abstract bouquet of watercolor flowers.
I’m Julie (@harp_and_crow on Instagram) and I can’t wait to share this project with you. I am going to walk you through it step-by-step, but you can also watch the video tutorial instead. I can’t wait to see what you create! Let’s get started.
Supplies

- Watercolor paper
- Watercolor brush – I used size round 8
- Black monoline pen
- White gel pen
- Watercolor paint: two blue shades and a greenish-blue (I used Perylene Green, Indigo & Lunar Blue)
- Opaque white paint
- Clean cup of water for rinsing
Step 1: Paint Loose Florals

You are going to be painting about 5 loose florals in the center of your watercolor sheet. Starting with one of your blue shades, use the side of your brush and press down to distribute the paint. Wiggle your brush to get a loose, petal shape. Give each flower about 5 petals if you’d like it to seem forward-facing, and about 3-4 petals if you’d like to give the illusion that it is facing towards the side. Alternate your blue shades while you work your way through this process. 
While your flowers are still wet, grab your opaque white color and drop a small amount of paint into the center of each flower. You can use watercolor or acrylic paint for this step, but if you don’t have either of those available, use water! A clean drop of water will take some of the paint away from that spot and leave you with a fun, textured center.

Need some floral inspiration? Peggy's Guide to Nature Drawing & Watercolor has you covered.
Step 2: Paint Stems and Leaves 
Using your greenish-blue shade, paint some thin stems from the center of each flower. Lightly tap the green onto the wet blue paint for some pretty blending. I like to think of these stems as a “whisper” of a stem, sort of like they are floating in space.
Use the same color to paint some leaves along the stems. Paint them so that they are on a diagonal angle, to add a little interest for your eyes. You can vary the size and saturation of these as well.
Step 3: Add Paint Splatters 
Soak the brush in one of your blue shades and tap the brush over your index finger to splatter a bit of paint on your paper. This step is totally optional, but I feel that it adds a whimsical quality to your flowers!
Allow your paint to dry completely before moving on to the next step!
Step 4: Embellish Your Loose Florals 
Once your paint is dry, grab your white gel pen and add some lines to each flower petal. Start toward the center of your flower and draw about three lines along the petal. For a little variation, you can add some small dots to the center of one shade of flower (I used dots on the center of my indigo florals, for example.)
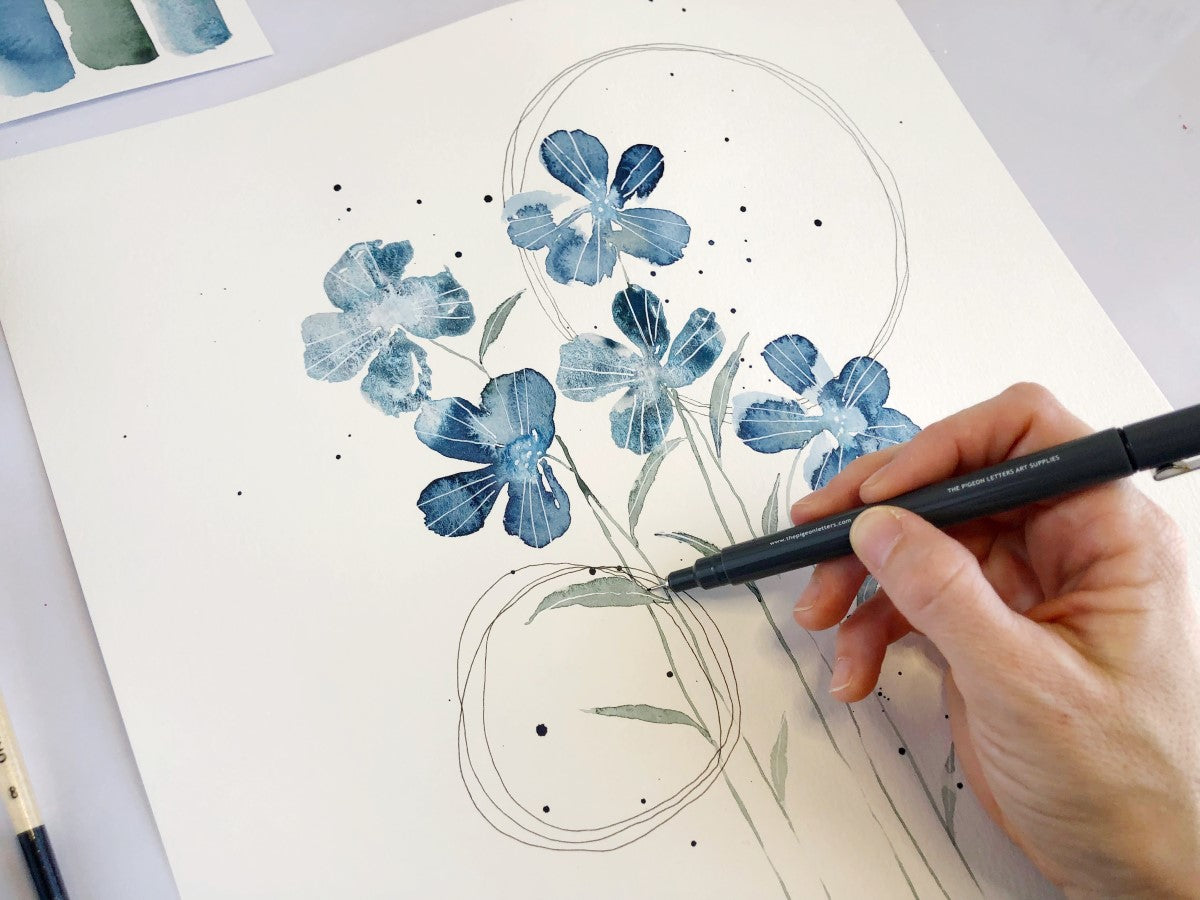
The last step is to use your black monoline pen and add some circular elements to the background. I chose to add three, overlapping circles to the upper right section behind the flowers and three smaller, overlapping circles to the lower left section of the painting. Be sure to keep the shape organic. These circles add a bit of balance to the piece, so if you think they should land somewhere else on your page then feel free to move them around. This is your work of art at the end of the day!

Once you are satisfied with your abstract embellishments, you’re finished! You have a one-of-a-kind loose abstract watercolor masterpiece!
If you try out this tutorial, let me know! Tag me on Instagram because I would love to see your work. Thanks for creating with me today!

Julie is a self-taught artist living in Central California with her husband & three daughters. She rekindled her love of art during the most trying years of early motherhood and has found a passion for helping others ignite their creative spark. Check out more of Julie's tutorials on the blog!


