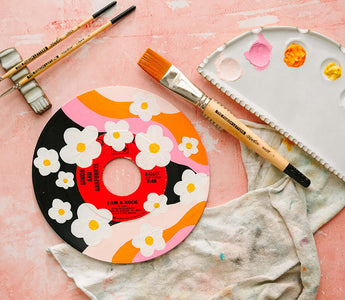
I love having a gallery wall in my living room filled with photos and artwork from my travels. But sometimes a wall full of rectangular frames gets boring, so I like to add unexpected pops of art to make it more interesting. In this project I’ll show you how to take old vinyl records and turn them into a whimsical piece of art to hang on your wall.
Supplies:
- Vinyl record in whichever size you prefer
- Gesso
- TPL paintbrushes
- Craft acrylic paint
- Matte varnish (optional)
- Paint supplies: palette, cup of water, rag

A note on sourcing vinyl records:
While you might be tempted to grab a vinyl record from your dad’s collection - don’t! Once a record has been painted on it can no longer be played, so you don’t want to make someone really unhappy. I always go to my local thrift store to grab the most random or scratched up vinyl records and they only cost me $1 each. Vintage and nostalgia stores usually carry a slightly more curated collection of vinyl records which are less likely to be scratched and they’ll cost more, which is why I recommend a thrift store or even yard sales.
Watch the process unfold below!
Step 1: Prep the vinyl surface
When working on non-traditional canvases it’s so important to prep your surface so that the paint will adhere properly. Using your rag, wipe down the record to remove any dust or dirt.

Step 2: Paint a base coat of gesso
Next you’ll use a medium called gesso to act as a base coat on the vinyl. You’ll need to decide whether your design is going to cover the entire record, just the black vinyl part, or individual shapes (allowing the vinyl to show through).

Use gesso to cover any area that will be painted with your design. This step can be imperfect - the gesso will be entirely covered by paint and doesn’t need to have more than just one coat for it to do its job.

Step 3: Paint the first coat of your design
Once the gesso has dried to the touch you can begin painting your design. Acrylic craft paint can be thick sometimes, so it’s best to lay down several thin coats instead of globbing on one thick, streaky coat.


If your design has overlapping areas like mine does, take it one area at a time allowing the previous section to dry a bit before adding the next. You can use a small fan to speed up the drying process if you’re impatient like I am!

Looking for a perfect ceramic piece for your painting adventures?
Step 4: Add additional layers and coats
It’s best to get all of the colors in your first layer done before coming back around for a second coat in each color. Some colors, such as orange or yellow, might require more coats because the formulas tend to be more streaky than others. Don’t forget to switch your paintbrush out for a smaller size to get in any tight corners or curves.


Allow each coat to dry before adding the next one; painting on top of wet acrylic will just pick up the layer beneath it and leave a big spot so you want to be sure you’re painting on top of only dry paint.s


Step 5: Add varnish (optional)
Once all of your coats of paint are dry, you’re done! Your vinyl is ready to hang on the wall now!
But if you’d like to add an extra layer of protection you can add a coat of varnish. Wait until the paint has been drying for 24-48 hours before adding a varnish coat. Your local craft store will have an overwhelming number of varnishes and top coats, but I personally prefer a matte varnish that can be found in the acrylic paint section.

Paint on a light coat and make sure it’s spread out evenly over the entire surface. Allow this to dry completely and then hang your beautiful creation up on your wall!

I hope you fall in love with painting on non-traditional surfaces like I have! Definitely give this project a try and snap a photo of the final piece hanging on your wall. Share it on social media and be sure to tag me @thealiciabruce and @thepigeonletters so we can see your creations!


See all of Alicia’s tutorials on the blog!
Alicia is a whimsical artist with a love of color and a refusal to act her age. She favors a mix of pastel and bright colors, reminiscent of southern California and the 1960s, and is inspired by her travels around the world. If she’s not at her desk, you can find her riding her skateboard around her neighborhood like a 6 year old.


